Usage - How to do a Soft Shuffle?

Soft Shuffle Usage Concepts
This page leads you through using Soft Shuffle with no prior knowledge assumed. This section introduces some concepts to keep in mind for the next section, a walkthrough of using Soft Shuffle.
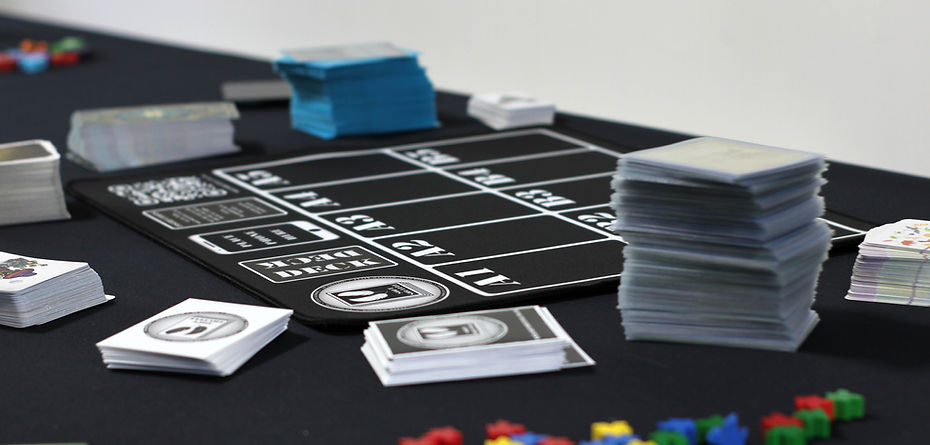
There are a few terms it's useful to understand. The mat has a number of Mat Spaces arranged in a labelled grid (labelled A1, A2 etc). We Deal out the full deck of cards onto the Mat Spaces to form Piles. We may choose not to use all of the Mat Spaces for Piles. Once all the cards are dealt out onto the mat, we Gather them back into a deck again by placing the cards from one Pile onto the next Pile in order.
A Pass is a round of a Deal and Gather, and each Pass starts and ends with a full deck of cards. The number of Passes is defined by the number of cards being randomised and the number of Mat Spaces being used for Piles. While we generally aim for 2 Passes, with few enough cards 1 Pass may be possible, and occasionally using 3 Passes may make more sense.

Piles vs Passes
The main user decision is what size of mat to use, and how many of the mat spaces to use for piles.
Given a specific number of cards (the deck we are randomising), if the number of piles is equal or greater than the number of cards we can randomise in only 1 pass. If the square of the number of piles is equal or greater than the number of cards we can do it in 2 passes. If the cube of the number of piles is equal or greater, 3 passes (and so on).
Generally 2 passes gives the best trade-off of space used vs time spent dealing out the cards. We can always choose to trade-off the number of passes vs the number of piles used based on personal preference and choice of mat though.
Columns, Rows and Odd Numbers
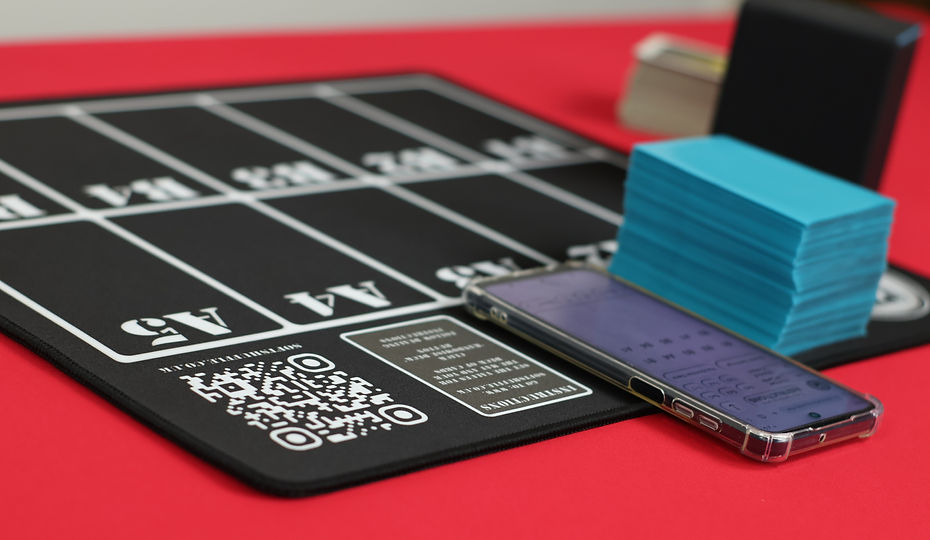
The mat spaces are labelled with letters and numbers - the rows (the height) are labelled A, B, C, with the columns (the width) labelled 1, 2, 3, and so on. So each space is labelled A1, B4, C3, and so on.
It is best to use an odd number of columns, and when considering the Piles vs Passes trade-off, keep that in mind. There is a full discussion of why odd numbers of columns is best in the Mat Label Mapping section of the Technical page.
Most people find they have a personal preference between (for example) using 7 x 1 vs 5 x 2 (columns x rows).

Mat sizes and Phone Placement
Again in the Mat Label Mapping section of the technical page there is some discussion of the two initial mat sizes - 5 x 2 and 7 x 3. These are sweet spots for different options for different numbers of cards.
The general expectation is you'll be using a phone for this, and given the screen size of a phone you'll want an unobscured view of it while dealing. So place the phone at the top or off to the side of the mat spaces - hence the phone placement spot on mats.
While 5 x 2 and 7 x 3 are the initial sizes offered, if you think something different would work better for you I encourage you to grab a pen and some cardboard, try out something different and leave some feedback!

Soft Shuffle Usage Example
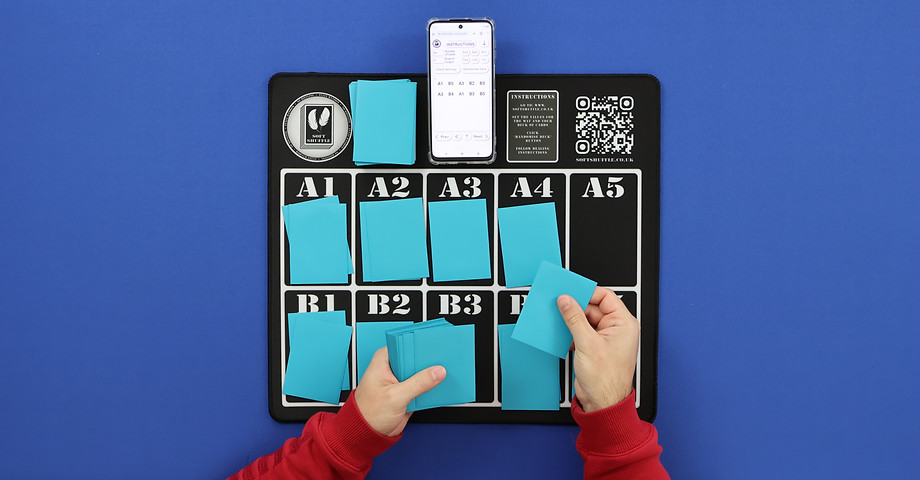
With the understanding of the usage concepts from the last section, lets go through a demo. We'll use a 5 x 2 mat and a 60 card deck.
First, we grab the physical items and lay them out - a phone, a mat, and a deck of cards - give them a quick count if needed.
Next, we navigate to the Shuffler page (the QR code on the mat brings you to the site), and place the phone as per preference - in this case we set it above the mat spaces as shown.

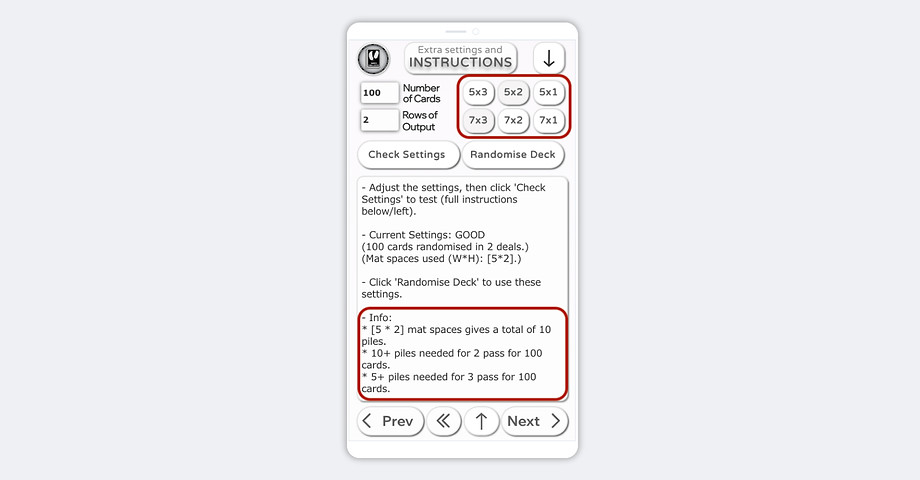
Check Settings
We have 60 cards, and we're using a 5 x 2 mat, so we type 60 cards into the 'Number of Cards' field and click on the '5 x 2' preset mat size button (A). We then click the 'Check Settings' button the check these initial settings (B).
We see what the output window tells us - with 60 cards and 10 spaces, it will only require 2 passes (2 deals and gathers) as shown (C).
If we wanted to explore a bit more, we look at the 'Info' section of the output - which tells us we need 8+ piles for 2 passes, 4+ piles for 3 passes (D). A 5 x 2 mat has 10 spaces for piles, which gives us a few options.
Theoretically we could use 4 x 2 and still only need 2 passes, or 5 x 1 allows us to use only one row of spaces but would require 3 passes. To try 5 x 1, you would click the '5 x 1' button and click 'Check Settings' again. 4 x 2 isn't recommended (we want odd numbers of columns), but could be enabled using the Extra Settings discussed below.
2 passes with odd numbers of columns is generally what we're aiming for though, so we stick with 5 x 2.

Set Rows of Output & Randomise
By default, the number of rows of output (dealing instructions) is set to 2 as shown. More rows of instructions means less having to click to change the page, but makes it more difficult to keep your place as you deal (E).
2 is a good compromise, so we leave it set to that. We click the 'Randomise Deck' button and we're ready to start dealing (F).

Deal the deck
Deal out the cards in order to the mat spaces shown in the instructions (G).
Once you've dealt out a page of instructions, use the 'Next' button to navigate forward. There is also a 'Previous' button and a 'Rewind to the beginning of the instructions' button if needed (H).
Each page of instructions is numbered to help you keep track of your position (I).
Tip: With a large deck of cards, there is no need to hold all the cards while you deal, just take what you can hold and refill your hand when needed.
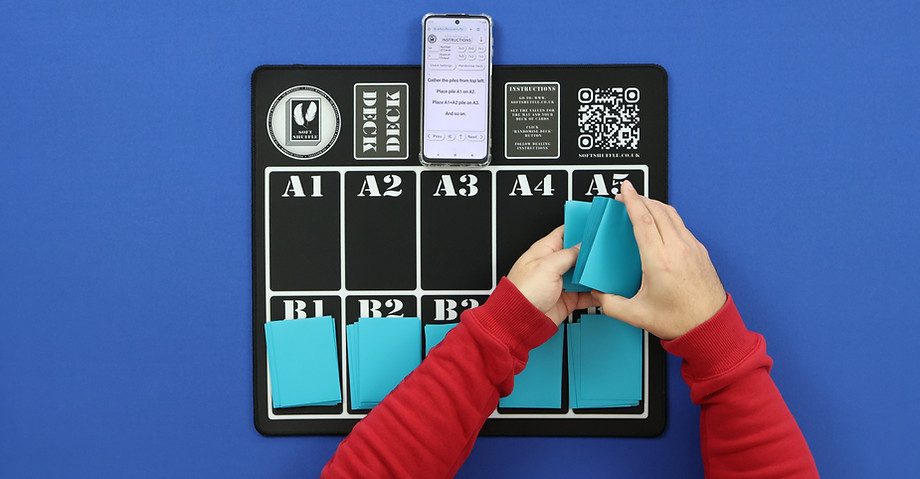
Once you've dealt out all the cards, the next page will have gather instructions - Click the Next button.

Gather and Re-deal
The gather instructions tell you how to gather the piles back into a deck. You will start with the pile located in either in the top left or bottom right corner, and place that pile on the pile next to it, that combined pile on top of the next pile, and so on (J).
Note: the direction you gather the piles into a deck after dealing it out alternates between passes.
Once all the piles are collected, clicking the 'Next' button again will take you to the set of deal instructions for the next pass.
After you've dealt and gathered the correct number of passes, the deck is now fully randomised - enjoy!

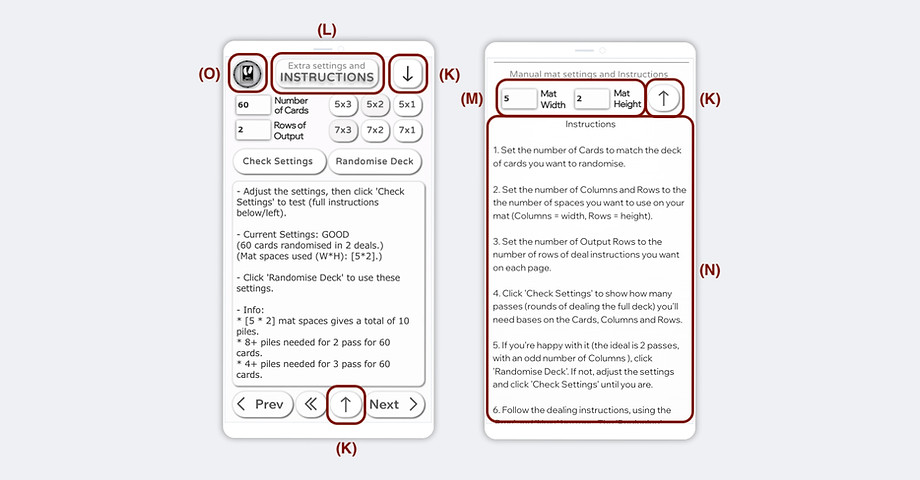
Extra Settings and Instructions
The desktop version of the shuffler page has enough real estate to fit some extra settings and instruction cleanly on a page without scrolling. The mobile version of the page has some extra buttons for navigation of lesser used functionality and instructions.
There are down and up arrow buttons to align to the top of the output (useful for phones with very small screens) and to return to the top of the page (K).
There is an 'Extra settings and instructions' button (L) to take the user down to where the mat settings can be input manually (M) and there are written instructions (N). The page also contains a logo button to return to the home page (O).
How do I (Dave) use Soft Shuffle?
I discussed the trade-off of using Soft Shuffle in the Overview page. But I think it's useful to talk about when and how I myself use it, to give some practical context. For me, when I'm considering the question of whether the trade-off is worth it, situations and games quickly fall into one of three categories:
-
When I'll always use it
-
When it's a judgement call
-
When I'll tend not to use it
Dealing the deck - generally twice - usually takes longer than a bunch of riffles/mashes & overhands, and I base my initial judgement on how important the deck being fully randomised is to me in this instance. But also often I either can't riffle/mash a particular set of cards well or I don't want to, especially if attempting a riffle will damage the cards.
When I use it every time
These are use cases where I will always use Soft Shuffle. A few examples:
-
Deck-driven games - e.g. the popular cat based polyomino game that inspired Soft Shuffle
-
150 card deck which is crafted each game by using different modules, expansions, etc.
-
Randomised once at the beginning of the game.
-
Dealing twice takes a bit of time, but the rest of the game setup by other players generally takes longer and offsets this.
-
I tend to use 7 x 2 or 5 x 3 mat spaces, and 2 rows of instructions to avoid losing my place.
-
-
Small sub-decks - e.g popular adventure game with combat and diplomacy decks
-
Game with small decks (20 / 30 cards) that you might use every turn and constant randomisation.
-
Very quick to randomise, and I often leave mat set up next to the game.
-
I tend to use 5 x 1 or 7 x 1 if possible, sometimes 7 x 3 if that gets it down to 1 pass.
-
All the instructions on one screen if possible, two if not.
-
-
Non-standard sized / shaped cards.
-
Square cards, tiny FFG cards, large tarot cards
-
These I often either can't riffle or can't mash (or don't want to because I have to bend them so much) and so I pretty much always use Soft Shuffle.
-

When it's a judgemental call
These are use cases where there is a judgment when or how to use Soft Shuffle. The decision for a lot of these is based on how much in-game re-shuffling is needed. A few examples:
-
Collectible Card Games / Trading Card Games e.g. 100-card version of classic CCG.
-
Constructed decks mean it's good to do a full randomisation at the beginning (either because its a large, sleeved 100 card deck, or its a competitive environment).
-
But you might need to shuffle the deck fairly often with some decks given how they play.
-
At that point I'd probably riffle / mash as best I can - the time trade-off for full randomisation is definitely a judgement call.
-
-
Deck cycling and more casual games - e.g. 150 card pirate themed push your luck game.
-
A popular end of night game with our group, that can involve cycling the deck multiple times in a 20 min game.
-
I fully randomise it occasionally (such as when i'm packing / unpacking games) but generally we do our best with riffling as we play.
-
It's not a game I'm precious about, it's not sleeved, and when the deck gets trashed I'm happy to get a new set.
-
-
Brand new games
-
For a lot of games I will do an initial full randomisation when I sleeve the cards.
-
It's always nice to pop a game off the shelf and know it's in a fully randomised state.
-
I can then decide whether to consistently use Soft Shuffle.
-
When I tend not to use it
These are games or situations I wouldn't expect to use Soft Shuffle. A few examples:
-
Party games
-
The general assumption is good enough is good enough - it's a party game.
-
Might randomise them the first time I get it out of shrink or occasionally if the game tends to order the cards.
-
Getting it out, playing and being done when there is 10 minutes spare is more important than the deck being fully randomised.
-
-
Standard 52-card deck games.
-
The size and number of cards in a standard deck has evolved for riffling, and a new deck is cheap. If I played for money I might consider it though.
-
-
Other peoples games.
-
If it's someone else game, it's up to them what their comfort level is, especially around wear and tear of a game.
-
As a bonus - I have actually tried using it for tile based games, and it works! But swishing tiles round on a table is a tactile experience I enjoy.
